FreeStyle Lite offers simplicity and convenience for blood glucose monitoring, utilizing compatible test strips with ZipWik Tabs for effortless testing and minimal blood sample requirements;
What is the FreeStyle Lite Meter?
The FreeStyle Lite meter is a compact and user-friendly device designed for individuals managing diabetes; It’s engineered to accurately measure blood glucose levels, providing essential data for effective diabetes control. This meter specifically works with FreeStyle Lite blood glucose test strips, featuring convenient ZipWik Tabs.
These tabs are crucial as they instantly draw blood into the test strip upon contact, eliminating the need for extensive sample application and minimizing wasted strips. The meter automatically powers on when a strip is inserted, streamlining the testing process. It’s designed for ease of use, making it suitable for a wide range of users. The system check screen appears briefly each time the meter is activated, ensuring proper functionality before each test.
The FreeStyle Lite meter aims to provide reliable results with a small blood sample, contributing to a more comfortable testing experience.
Key Features and Benefits
The FreeStyle Lite meter boasts several key features enhancing the user experience. Its compatibility with FreeStyle Lite test strips, equipped with ZipWik Tabs, ensures effortless blood application and minimizes sample waste. The meter’s automatic power-on function upon strip insertion simplifies operation, while the system check screen confirms functionality before each test.
A significant benefit is the small blood sample size required, promoting comfort during testing. The meter delivers accurate results quickly, aiding in informed diabetes management decisions. Its compact design makes it portable and convenient for on-the-go monitoring.
Furthermore, the meter provides clear and easy-to-understand results, empowering users to actively participate in their healthcare. Proper use, alongside adherence to guidelines regarding control solution and strip expiration, maximizes the meter’s reliability and effectiveness.
Intended Use and User Profile
The FreeStyle Lite meter is specifically designed for the in-vitro diagnosis of blood glucose levels. It’s intended for self-testing by individuals with diabetes at home, providing a convenient way to monitor their condition and manage their health. This meter is a valuable tool for those requiring regular blood glucose checks as part of their diabetes management plan.
The ideal user profile includes individuals who prefer a simple, easy-to-use glucose monitoring system. It’s suitable for people comfortable with performing fingersticks and applying a small blood sample to a test strip. The meter is also appropriate for those seeking a portable and discreet monitoring solution.
Users should be able to follow instructions carefully and understand the importance of proper meter maintenance and quality control testing with control solution.

Meter Components and Setup
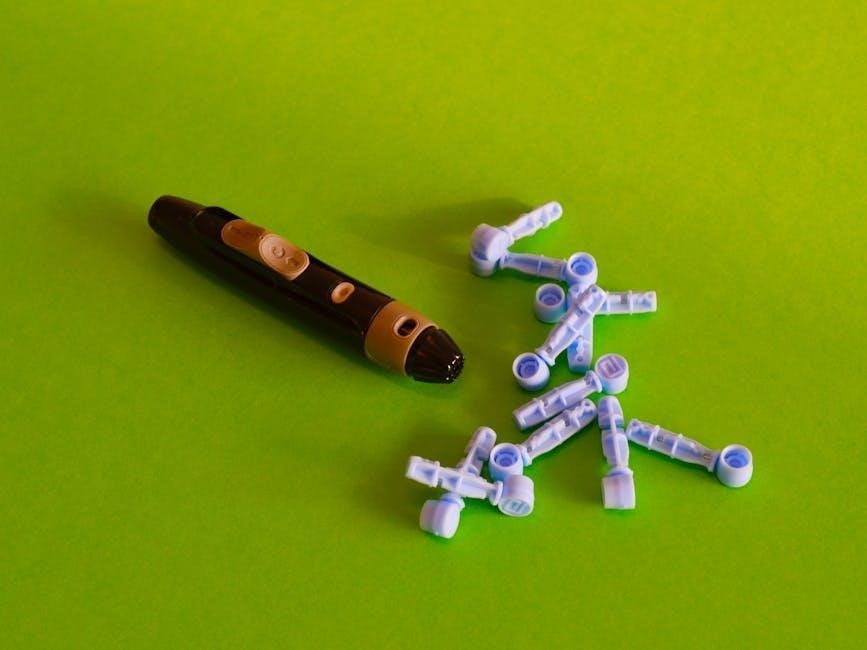
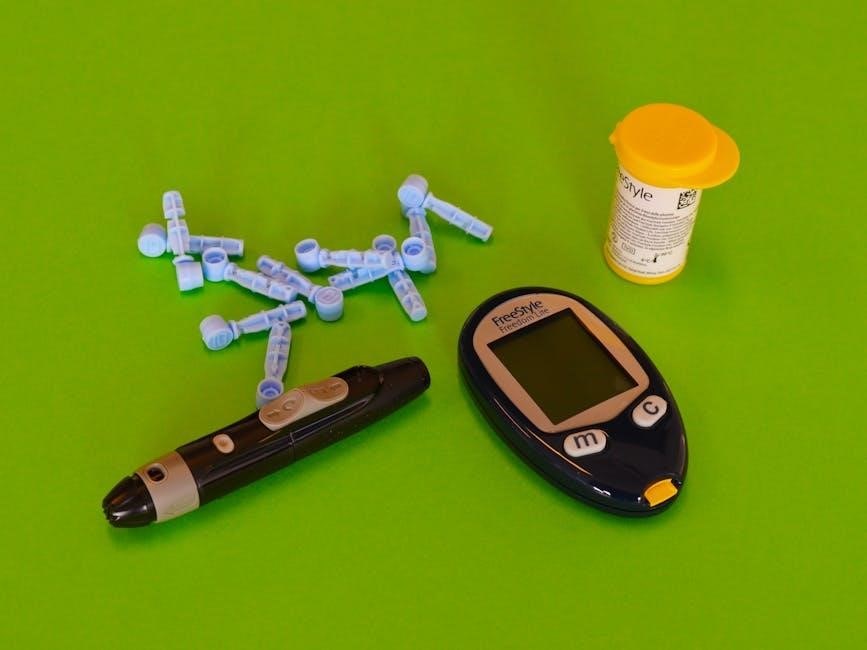
The FreeStyle Lite system includes the meter, a lancing device, lancets, test strips, and a user manual, ensuring a complete setup for effective glucose monitoring.
Identifying Meter Parts
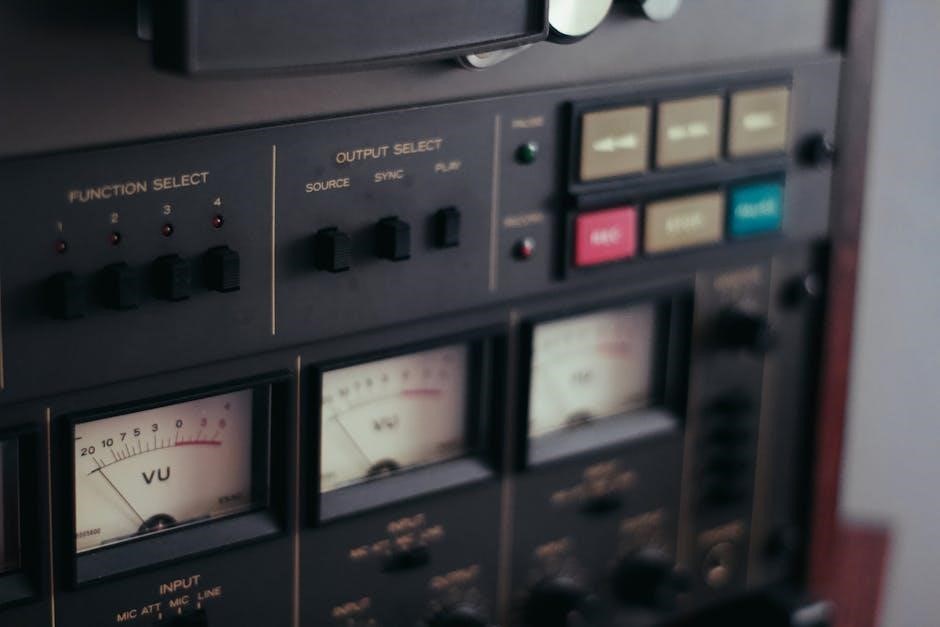
The FreeStyle Lite meter is designed with user-friendliness in mind. Key components include the meter itself, featuring a display screen to show glucose readings, a test strip port for inserting strips, and buttons for operation. Familiarize yourself with the test strip ejector, used to safely discard used strips.
The meter also has a battery compartment, typically located on the back, and a micro USB port for potential data transfer or charging (depending on the model). The lancing device, a separate component, holds the lancet and adjusts depth for comfortable blood sampling.
Understand the function of the test strip sample area and the drop and test strip symbols. The display will show various icons indicating meter status, such as battery level and error messages. Knowing these parts ensures proper setup and operation of your FreeStyle Lite system, leading to accurate and reliable results.
Inserting the Battery
To install the battery in your FreeStyle Lite meter, locate the battery compartment, usually on the back of the device. Gently slide or lift the battery cover to access the compartment. Insert a new battery, paying close attention to the polarity markings (+ and -) inside the compartment. Ensure the battery is correctly aligned before fully closing the cover.
Typically, the FreeStyle Lite meter requires a standard CR2032 battery. If the meter doesn’t power on after inserting the battery, double-check the polarity and ensure the battery is fresh. Avoid using damaged or corroded batteries.
Proper battery installation is crucial for accurate meter operation. Regularly check the battery level indicator on the display screen. Replace the battery when the low battery symbol appears to maintain consistent and reliable blood glucose readings. Always dispose of used batteries responsibly, following local regulations.
Setting the Date and Time
Accurate date and time settings are essential for proper record-keeping with your FreeStyle Lite meter. To set the date and time, navigate through the meter’s menu using the buttons. Typically, you’ll access the settings by pressing and holding a specific button, as outlined in the full user manual.
Once in the settings menu, select the date and time options. Use the buttons to adjust the year, month, day, hour, and minute. Confirm each selection by pressing the appropriate button. The meter will display the updated date and time on the screen.
Ensure the date and time are correctly set to maintain accurate tracking of your blood glucose readings. Incorrect settings can lead to confusion when reviewing your testing history. Refer to the complete FreeStyle Lite manual for detailed, step-by-step instructions specific to your meter model.

Performing a Blood Glucose Test
Begin by inserting a FreeStyle Lite test strip; the meter powers on automatically, initiating a system check before you obtain and apply your blood sample.
Preparing for the Test
Before initiating a blood glucose test with your FreeStyle Lite meter, ensure you have all necessary supplies readily available: the meter itself, a FreeStyle Lite test strip, a lancing device, and lancets. Wash your hands thoroughly with soap and warm water, then dry them completely – this is crucial for accurate results and infection prevention.

Gather a clean, dry surface to work on. Inspect the test strip packaging to confirm it’s unopened and within the expiration date. Ensure the meter is functioning correctly; if it doesn’t turn on, consult the troubleshooting section of this manual. Prepare the lancing device with a fresh lancet, adjusting the depth setting to suit your skin type. Remember, a smaller blood sample is needed thanks to the ZipWik Tabs, but proper preparation is still key for a successful and reliable reading.
Inserting the Test Strip
To begin, gently remove a FreeStyle Lite test strip from its protective packaging, avoiding touching the test area – the area with the ZipWik Tab. Immediately insert the test strip into the meter’s test strip port, ensuring it’s fully seated until it stops. The meter will automatically power on upon strip insertion, initiating a system check.
Observe the display screen; it will briefly show a system check message. If the meter doesn’t power on after inserting the strip, remove it and reinsert it, ensuring proper alignment. Note that the meter will automatically turn off after two minutes if a test isn’t started, requiring a new strip insertion to restart the process. The ZipWik Tab is designed to draw blood efficiently, so proper insertion is vital for optimal performance and accurate glucose readings.
Obtaining a Blood Sample
Prior to obtaining a blood sample, ensure your hands are clean and dry. Gently massage your fingertip to encourage blood flow. Use a lancing device, adjusted to a comfortable depth, to prick the side of your fingertip – avoiding the center for less discomfort. Wipe away the first drop of blood with a clean, dry cloth, as it may contain tissue fluid that could affect accuracy.
A small, hanging drop of blood is ideal for testing. Avoid squeezing your finger excessively, as this can dilute the sample with tissue fluid and lead to inaccurate results. The FreeStyle Lite meter requires a small sample size, thanks to the ZipWik Tab technology, but a sufficient drop is crucial for the test strip to properly draw in the blood and provide a reliable reading. Prepare to immediately apply the blood to the test strip.
Applying Blood to the Test Strip
Once you have a sufficient blood droplet, gently touch the edge of the test strip’s sample area to the blood. Do not smear or spread the blood; allow the ZipWik Tab to automatically draw the blood into the strip. The tab breaks the blood surface and instantly wicks the blood into the test strip, minimizing the amount of blood needed and simplifying the process.
Hold the test strip firmly against the blood drop until a black bar appears in the display window, indicating that enough blood has been drawn into the strip. Do not add more blood to the test strip after the black bar appears. The meter will then begin counting down, displaying the time remaining until your blood glucose result is shown.
Reading and Interpreting Results
After the countdown, your blood glucose result will appear on the meter’s display. The result is displayed in milligrams per deciliter (mg/dL). It’s crucial to understand your target range as determined by your healthcare professional. Regularly monitoring your blood glucose levels helps you and your doctor manage your diabetes effectively.
Keep a record of your results, noting the date, time, and any relevant factors like meals or exercise. This information is valuable for tracking trends and making informed decisions about your diabetes management plan. If your results consistently fall outside your target range, consult your healthcare provider for guidance and potential adjustments to your treatment.
Understanding Error Messages and Troubleshooting
The FreeStyle Lite meter displays error codes indicating issues; consult the manual for meanings and solutions, or contact customer care if problems persist.
Common Error Codes and Their Meanings
The FreeStyle Lite meter utilizes various error codes to communicate potential problems during operation. Understanding these codes is crucial for effective troubleshooting. For instance, if the meter displays “E-1”, it generally indicates that the test strip has not been inserted correctly or is damaged. Ensure the strip is firmly seated within the meter’s port. An “E-2” error often signifies that the blood sample was insufficient, requiring a repeat test with a larger drop;
“E-3” typically suggests an internal meter error, potentially needing customer support intervention. If you encounter “E-4”, it could mean the test strip is expired or has been exposed to improper storage conditions. Always check the expiration date before use. Additionally, “E-5” may appear if the control solution results fall outside the acceptable range, indicating a potential issue with the solution or the meter itself. Refer to the control solution testing section for further guidance. Remember to consult the complete list of error codes and their detailed explanations within the FreeStyle Lite meter’s user manual for comprehensive support.
Troubleshooting Meter Issues (Won’t Turn On, Incorrect Readings)
If your FreeStyle Lite meter won’t turn on, first ensure the battery is correctly inserted and has sufficient charge. Try replacing the battery with a fresh one. If the issue persists, contact customer care. For incorrect readings, verify the test strip is properly inserted and hasn’t expired. Ensure an adequate blood sample is applied, as insufficient blood can lead to inaccurate results.
If the meter displays an error code, consult the “Common Error Codes” section for specific guidance. Avoid using damaged or expired test strips. Regularly perform control solution tests to confirm the meter’s accuracy. If readings consistently seem off despite these checks, repeat the test with a new strip and ensure proper technique. Remember, environmental factors like extreme temperatures can also affect readings. If problems continue, do not attempt self-repair; contact customer support for assistance and potential meter replacement.
When to Contact Customer Care
Contact FreeStyle Lite customer care if your meter consistently displays error messages after troubleshooting, or if it fails to power on even with a new battery. Seek assistance if control solution results are consistently outside the acceptable range, indicating a potential meter malfunction. If you suspect inaccurate readings despite following all testing procedures correctly, or if the meter appears physically damaged, do not attempt repairs yourself.
Customer care can also assist with questions regarding test strip compatibility, warranty information, and proper disposal of used materials. They can provide guidance on interpreting complex results or offer support if you are experiencing difficulty understanding the meter’s functions. For any concerns about your health or treatment plan, always consult your healthcare professional. Detailed contact information for customer support is available in the complete user manual and on the manufacturer’s website.

Control Solution Testing
Use FreeStyle Control Solution with your FreeStyle Lite System to verify proper meter and test strip functionality, ensuring accurate results and reliable performance.
Purpose of Control Solution Testing
Control solution testing serves as a vital quality check for your FreeStyle Lite meter and test strips, confirming the system is functioning correctly and delivering dependable blood glucose results. Unlike a regular blood glucose test, control solution testing doesn’t involve a blood sample; instead, it utilizes a specifically formulated liquid designed to mimic the glucose levels found in blood.
This process verifies that all components – the meter, test strip, and your technique – are working in harmony. It helps distinguish between issues with the meter or strips versus potential variations in your blood glucose levels. Regularly performing control solution tests, especially when opening a new box of test strips, after a meter issue, or if you suspect inaccurate readings, provides peace of mind and ensures the reliability of your monitoring system. Remember to always use FreeStyle Control Solution specifically designed for use with your FreeStyle Lite meter.
Performing a Control Solution Test
To begin, ensure you have FreeStyle Control Solution that is not expired and hasn’t been open for more than three months. Gently mix the control solution by rolling the bottle between your hands. Insert a FreeStyle Lite test strip into the meter until it powers on. The meter will display a system check screen. Instead of applying a blood sample, touch a small drop of control solution to the test strip’s sample area – indicated by the drop and test strip symbols.
The meter will analyze the control solution and display a result. Compare this result to the control solution range printed on the test strip vial. If the result falls within the specified range, your system is functioning correctly. If not, repeat the test. If repeated tests fail, do not use the meter and contact customer care for assistance. Never add water or any other liquid to the control solution.

Interpreting Control Solution Results
After performing a control solution test, carefully compare the displayed result with the range printed on the FreeStyle Lite test strip vial. This range confirms the meter and test strips are working correctly together. If the result falls within the specified range, your system is functioning as expected, ensuring reliable blood glucose readings.
However, if the control solution result falls outside the stated range, it indicates a potential issue. Immediately repeat the control solution test, ensuring a fresh drop of unexpired control solution is used. If the result remains outside the range after a second attempt, do not rely on the meter’s readings. Contact customer care for support and do not attempt to use the meter for blood glucose testing until the issue is resolved. Accurate control solution testing is vital for confidence in your results.


Leave a Reply
You must be logged in to post a comment.